Animating in Maya - Run Cycle
For this tutorial I will be showing a step by step process of how to acheive a run cycle using a bi-pedal character rig.
Research
The first stage most animators start with is research, and finding some kind of reference, or create their own in which to base an animation on.
For a run cycle it is a good idea to find reference footage perhaps on youtube or by studying the key frames involved.
An example of a 'normal' run cycle:
 |
| Edward Muybridge’s 1887 motion study of an athlete running |

This version I found shows a cleaned up line drawing of the reference above.
I complied these drawings as an animated .gif

I complied these drawings as an animated .gif

One thing that is apparent from rotoscoping footage is the lack of weight conveyed and the overall 'floatyness' of the animation.
The more exaguratted/strong the poses are the more appealing an animation can be. Why animate an ordinary run when motion capture technology can be used for this? For a more cartoon or animated result it is good to build on this ordinary run but strengthen the key poses/exaggurate and maybe play with the timing.
I aim to mimic the key poses with max as close as I can and then tweak where I feel necessary

For this tutorial we shall be using the latest student version of Autodesk Maya 2011

Changing Preferences
Window>Settings/Preferences>Preferences and a window should open
. Click on settings on the left hand side and make sure time is set to PAL (25 fps)


 For this frame the main square controller translates up and forwards, in this case -4 (an increase of around 2 from the previous frame). I moved the control so his body is above and pretty much in line with the foot in contact with the ground. The left leg is still coming forward and down. Translate the foot controller accordingly and lower the value of toe heel roll to around 100.
  For the passing position Maxs' right leg remains bent, however the left leg is now fully infront of the other. Translate the main controller up (by about +1) and move forward so it looks like he is anticipating the up position. Toe heel roll on the left leg decreases again, in this case down to 45 and the right foot in contact with the ground is just starting to lift away from the ground. To do this I used the ball roll attribute and gave it a value of 20. Try to re-create this pose.

 The up pose is not too different from the previous frame. In this frame the back leg is now completely straight and the front leg has moved forward a bit. I selected the main controller and returned it to 0 in the Y axis and moved it forward to straighten out the back leg. The back foots ball roll increases, this time to 35. The front leg has moved forward and down slightly, and toe heel roll has decreased, this time from 45 to 25. The overall effect of this pose is to make it look like he is pushing away from the ground in order to make a small leap where both feet aren't touching the ground.
Extra detail for the feet
After blocking the legs in I used the toe bend attributes in each pose to create a floppy feel so the feet don't feel too stiff. Again I used Richard Williams example as reference.

The Arms
 Usually I work up from the feet, in this case I will be blocking the arms first just so I can see the end result a bit quicker.
I will not go through every pose here, what I did was used Richard Williams' example and tried to match the arms up as closely as I could.
The head
Graph editior / Clean-up

 open preferences > Window > settings/preferences > preferences


Maya has tried to create inbetweens, hit play in the timeline to see the default results.
Reference
For this run in particular I am basing it on one of Richard Williams' from the Animators Survival Kit.
 |
Click to enlarge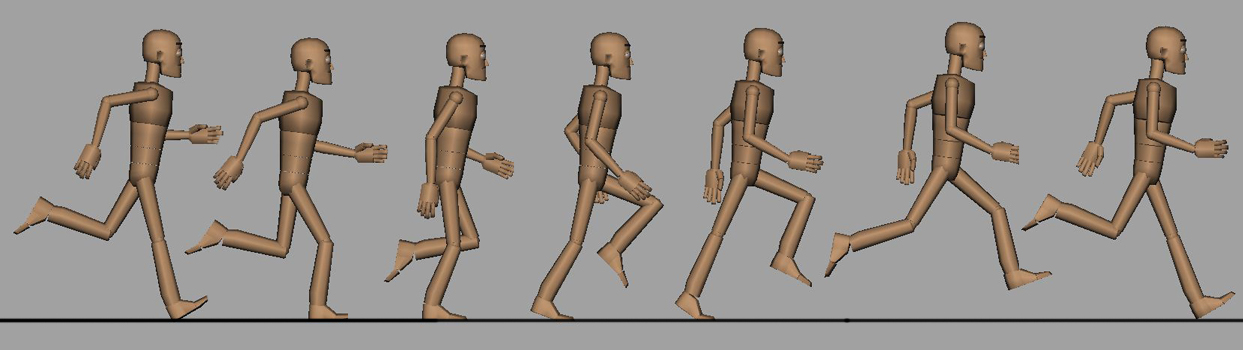 Here is a slowed version of the completed run. |
Maya
For this tutorial we shall be using the latest student version of Autodesk Maya 2011
The rig we shall be using is 'Max for Maya 1.1.4 found on http://www.creativecrash.com/maya/downloads/character-rigs/c/max-for-maya
You will have to sign up as a member to download the file.
Once downloaded open Maya and the character rig.
Setting up your project.
Setting up your project.
Create a project within Maya. Click File>Project>New and a new window shall open

Name the project Run_Cycle (or something similar) include an underscore for a space as a blank space as Maya does not allow blank spaces in name titles.
Then click use defaults at the bottom and then accept.
To set the project click Window>Project>Set and select the folder from Maya projects.
Changing Preferences
Window>Settings/Preferences>Preferences and a window should open
.
 Click on settings on the left hand side and make sure time is set to PAL (25 fps)
Then the animation option underneath there is the option for default out tangent and deafult in tangent.
From the drop down menu change in to 'linear' and out to 'stepped'.
Also in this menu make sure autokey is ticked.
Finally go to Time Slider and make sure that playback speed is set to Real-time [25 fps].
workflow for this stage.
For easier viewing I recommend the following steps.
Turning off the background gradient:
To do this simply open Maya's preferences > Display > select off next to background gradient.

I find this helps to define the characters outline, especially from the side view when creating the key poses
Camera View:

For easy viewing I like to create two windows, One in side view and one in perspective. To select one on its own select the desired window and press the space bar, and to return press space again. The perspective view could be exchanged with a camera; set up in a desired angle so you can see what it will look like in the chosen perspective. This is called animating to the camera.
This may be useful when more than one key is set as you can drag through the animation timeline and view the animation from two angles. I also found it helpful for selecting controllers
A further suggestion...
Before starting the block out I would recommend going to the timeline and navigate to frame 0. I would the select all of Max's controllers and set a key there. We will be blocking from frame 1 onwards and the original T-pose will not be part of the animation but can remain there incase something goes wrong or if you were to want to animate the anticipation for the run itself after the run has been blocked.
Blocking out the legs
When animating something like this it is good to work systematically. Working from the legs up and saving in stages, as opposed to creating each pose frame after frame.
The controllers used for this stage will the feet and the main controller square that is around max's stomach.

We will only be using translating the main control and feet in the Z and Y axis (forward and up), and altering only toe heel roll attributes (found in the attribute editor/channel box: CTRL+A when foot controller is selected). We are leaving out the other controls and options such as rotate, because for now we don't want to confuse what is going on, just yet.
Creating the contact pose.

Main Controller: Firstly I rotated the main controller (although I mention rotate wouldn't be used at this stage) in X by 7 and forward by 5.5. This is to give the appearance of forward momentum. I did not translate in the Y direction and left 0 as the starting height.
Feet: I then selected the right foot controller and translated it forward in the Z axis to around positive 31.5 and under the toe heel roll options (found in the channel box) I gave it the value of -30. It is important not to rotate the feet controllers to acheive the angles as it complicates matters.
The back foot (in this case left) is translated backwards in Z to -100 and up in Y to 55. I also gave toe heel roll a value of 120.
*worth noting: The knee locator controllers (spheres infront on knees) can be used to direct the angle of the knees. For this animation we must insure that they are always a resonable distance infront of Max and keyed in a way that they remain infront, otherwise the rig will not pose correctly.
Summary of this stage...
I did not know these values when I began posing. I tried to recreate the angles as best I could from Richard Williams' side on example, I then rounded these numbers to the closest whole number out of personal preference.
The angles I created are not identical to the reference as the proportions of the two characters vary slightly. I had to bear in mind the front leg should be straight and forward with the feet angled upwards as it is coming into contact
*Worth noting: This character rig can be stretched; So When translating the right foot forward drag it so it is naturally straight and not stretched way out infront
Below is an extreme example...

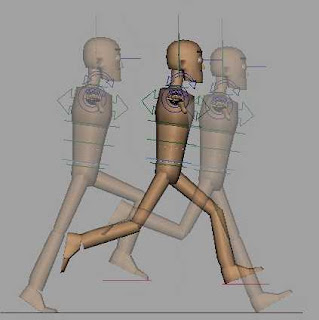
Frame 2 - The down
Frame 2 is down pose.
 |
| If the animated .Gif doesn't work in this view click to open in a new window. |
This animated .Gif shows what it should look like when scrubbing between the two.
As you can see the leading right foot hits the ground, to do this return toe heel roll to default 0.
The main controller is lowered in the Y axis (around -6.5) and forward in the Z as he is coming down into the step. The exact value I used is 15, but it is important to come to these values yourself. I tested a few values here and switched between the two frames until I was happy with the weight of him going down
The back leg is now coming forward and down slightly in this frame and the toe heel roll increases a bit (125)
* You can also see where I keyed the knee locators infront as these do not want to get left behind as Max moved forward.
Frame 3 - After the down
 For this frame the main square controller translates up and forwards, in this case -4 (an increase of around 2 from the previous frame). I moved the control so his body is above and pretty much in line with the foot in contact with the ground. The left leg is still coming forward and down. Translate the foot controller accordingly and lower the value of toe heel roll to around 100.
 Frame 4 - Passing position
 For the passing position Maxs' right leg remains bent, however the left leg is now fully infront of the other. Translate the main controller up (by about +1) and move forward so it looks like he is anticipating the up position. Toe heel roll on the left leg decreases again, in this case down to 45 and the right foot in contact with the ground is just starting to lift away from the ground. To do this I used the ball roll attribute and gave it a value of 20. Try to re-create this pose.
Frame 5 - The up

 The up pose is not too different from the previous frame. In this frame the back leg is now completely straight and the front leg has moved forward a bit. I selected the main controller and returned it to 0 in the Y axis and moved it forward to straighten out the back leg. The back foots ball roll increases, this time to 35. The front leg has moved forward and down slightly, and toe heel roll has decreased, this time from 45 to 25. The overall effect of this pose is to make it look like he is pushing away from the ground in order to make a small leap where both feet aren't touching the ground.
This .Gif shows the snap in the back leg between this frame and the last (click to enlarge)
Frame 6 - The leap
This frame was the hardest for me to acheive as I had to judge how much energy is being used and how far forward and off the ground the character would be. This took a bit of trial and error and switching between this and the previous frame until I was happy with the result. This is the pose right before the next contact. The back leg has now lost all ball roll and toe heel roll is now at 100. The leading foot has gone from 25 down to -20
This picture shows the difference in spacing, highlighting the leap it show that this is the one with most space covered since the previous frame.
Repeating the opposite poses
Now with the legs blocked out for one step it is time to repeat this process with the left foot leading the contact.
Extra detail for the feet
After blocking the legs in I used the toe bend attributes in each pose to create a floppy feel so the feet don't feel too stiff. Again I used Richard Williams example as reference.

Rotating the feet to face outwards is also important as no-one runs with the feet directly infront, there is always some turn outwards. For this select the controller and rotate in the Y axis only. Make sure they are keyed at the same degree of rotation whilst the foot is on the floor. When the foot leaves the floor I return it to 0.
The Arms
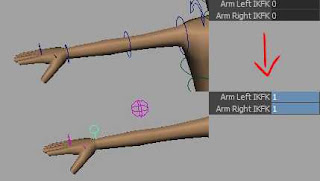
 Usually I work up from the feet, in this case I will be blocking the arms first just so I can see the end result a bit quicker.
 By default max's arms are set to FK (forward kinematics) and need to be changed to IK (inverse kinematics) for the run. select the root control and open the attribute editor and add a 1 in where there are 0's for the arms.
I will not go through every pose here, what I did was used Richard Williams' example and tried to match the arms up as closely as I could.
The controls used are the circle above the wrist, translate and rotate accordingly and set a key for each pose. The elbow control is also useful to determine how much they will stick out.
The Hips
The hips I only keyed on certain frames. I also only keyed rotate Y & Z values.
The first contact pose where the right leg is leading I rotated the hips in the positive Y direction. This is so it appears the right side of the hip is leading with the right foot and the left side is back along with the left leg.
For all passing poses I return all hip rotation values to 0 and key.
On the up pose where the back leg is completely straight I key in a rotation on the hip in positive Z to around 3.5 and rotate in Y at 1.5-2
I then start with the following contact pose, passing and up and repeat but in the opposite.
By keying every other frame maya will work out the inbetweens when the animation is later turned from stepped to linear.
The Chest
The chest works on the same principle as the hips, keyed on those certain frames but in opposite to the hips. For example if the right leg is leading and the hip is turned so the right is forward then the chest has the left arm/ side of chest Turned in this way.
The head
I have only added some nod to the head in this animation. To do this on the down pose the head is angled up slightly as he is going down and angled down on the up pose. Do not key for every frame only these extremes and key the value of 0 for the contact and passing frames, this way when smoothed out later it will work out the inbetweens more evenly.
Graph editior / Clean-up
The animation is now fully blocked out and ready for the next stage which is to take it from stepped animation and allow the computer to make some inbetweens for a smoother animation.
Before we do anything I get the keys which have been placed one frame after another and spread them out along the timeline. This is the timing stage, for this run in particular it is a 'normal' run on 6's (4 steps per second) so I stretched the frames to roughly fit this.
Select all controls > hold shift and drag along all the keys to highligh red > click and hold the furthest arrow on the right > drag to spread them out.
Change animation preferences...
open preferences > Window > settings/preferences > preferences Now we must change the animation settings to linear from stepped (which we had set it to earlier). To do this under settings listed on the left hand side there is the animation settings, change the default out tangent from stepped to linear.
Save these settings, also save this as a new version of the run cycle.

Select all controls and open the graph editor: Window > Animation editors > Graph editor.
press 'F' over the selection to fit it in the window, drag select all of the keys to highlight, then click linear tangents.

It should now look like this >
Maya has tried to create inbetweens, hit play in the timeline to see the default results.
It is now our job to go in and make corrections to these 'F-Curves'.
I will not be going through each control but will give a basic overview of this stage.
For each control keyed there is a curve associated with it. I use spline tangents, flat tangents and also delete uneccessary keys (If you delete a key that doesn't help define the curve make sure of this by scrubbing through the animation to see the result).
Sticky feet...
On the frame after the back foot leaves the floor there is the tendancy for it to float away. At this stage I would add new keys and re-position the foot closer to the point it left so it doesn't just float away from the ground. (the problem with the computer working it out in the first place is that it wants to make everything exactly smooth and even).
From this point it is a matter of refining certain keys, also making sure not everything is too clockwork and there is some randomness to the animation.
Extra details can be included/exaggurated, for example in this run Max's back doesn't move too much, there could be room for movement here but it's down to personal preference.
Simple light setup
 Using 3 Directional lights we can create a simple light setup. It consists of the main key light that is responsible for lighting the majority of the object and cast shadows. A second fill light and a final one to light the dark patches.
Directional lights are only influenced by rotation and not by translation or scaling
Create one: Create > Lights > Directional light
aim it towards max, leave the intensity at one but turn on depth map shadows in the attribute editor and increase the shadow resolution to 1024 and filter size to 3 for a soft edge shadow.
Create a second light, this time aim on the opposite side of the object. For this fill light you must turn the intensity right down to around .25 and uncheck the box which says 'emit specular'.
For the final light duplicate the last, keep 'emit specular' unchecked and raise the intensity to around .5-6, this is positioned round the back of the object to light the darker regions.
From this point it is a matter of refining certain keys, also making sure not everything is too clockwork and there is some randomness to the animation.
Extra details can be included/exaggurated, for example in this run Max's back doesn't move too much, there could be room for movement here but it's down to personal preference.
Simple light setup
Using 3 Directional lights we can create a simple light setup. It consists of the main key light that is responsible for lighting the majority of the object and cast shadows. A second fill light and a final one to light the dark patches.Directional lights are only influenced by rotation and not by translation or scaling
Create one: Create > Lights > Directional light
aim it towards max, leave the intensity at one but turn on depth map shadows in the attribute editor and increase the shadow resolution to 1024 and filter size to 3 for a soft edge shadow.
Create a second light, this time aim on the opposite side of the object. For this fill light you must turn the intensity right down to around .25 and uncheck the box which says 'emit specular'.
For the final light duplicate the last, keep 'emit specular' unchecked and raise the intensity to around .5-6, this is positioned round the back of the object to light the darker regions.
This is a front on view of the run
This is a perspective view of the run