For this unit i have joined with, josh, richard and harry to create a 1920s 'speakeasy' style bar during the prohibition years in the U.S.A.
My role within the group mainly involves modelling/texturing.
My first Ideas was a list of potential props I could model to go in the bar.
1920s Bar – Prop Ideas so far...
· Pool Table – Pool Cues + Rack, Balls, Triangle, Chalk
· Art Deco Radio
· Ceiling Fans
· Glasses - Spirits, Wine, Beer - Pint & ½ , Tankard
· Bottles – Beer, Wine, Spirits (upside down and holder)
· Beer Pump, Beer Keg
· Beer Crates/Bottle Holder – Boxes stacked
· Wine Barrel, Wine Rack
· Shelves – Bottles, Glasses, Books
· Gambling - Tables - Cards, Dice, Dominos, Roulette, One Armed Bandit
· Seating – Stools at Bar, Wooden Chairs, Comfy Chairs, Booth
· Tables – Beer Mats
· Coat Hooks/Hat Stand
· Mirrors
· Clock - Wall Mounted or Grandfather
· Wall Mounted Telephone
· Smoking - Ashtrays, Cigarettes/Boxes, Zippo, Matches, Cigar/Tobacco Jar
· Music - Stage, Curtains, Microphone, Piano, Drums, Double Bass,
· Lighting – (depending on mood) lamps/lights, pool table, gambling tables
· Mop and Bucket/Broom
· The Bar itself – Sink behind, Cash Register, Safe
· Tommy Gun/Shotgun on Wall
· Brick Wall
Styling - Colour


These two images I came across represent the sort of dark feel I think would work for our groups environment. The first being clearly film noir and the second being a standard dingy bar.
The dark hard woods mixed with low lighting helps give it a moody atmosphere. specular caught off of the bar and bottles are easily distinguished as they catch the light and gleam in the darkness.
I hope we can acheive someting similar to this.
Art Deco

Art Deco
Art deco was a design movement that originated back to the early 20th century. In general designs use curves, symetry and can have have stepped form.
When referencing furniture and props I will look for items from this period.


I also tested lighting with the gramaphone, trying to get dark shadows in the corners and recreate the moody feel.


This is a render of a barrel and crate for use in the environment. This was a texturing test, the concrete floor being a sample that I tiled by using the offset filter in Photoshop.
 This bin from the alley was modelled by me but I have taken someones hard work of texturing straight from their website.
http://cubedude89.blogspot.com/2008/07/texture-trash-can.html


For the Tommy gun I Found the stencil above and created my own line drawing from it. I transfered it to maya on a plane and created the model below.

The model itself is very basic and wasn't meant to be highly detailed, more of a prop. Richard will texture it as this task has been allocated to him


http://cubedude89.blogspot.com/2008/07/texture-trash-can.html
Tommy Gun


For the Tommy gun I Found the stencil above and created my own line drawing from it. I transfered it to maya on a plane and created the model below.

The model itself is very basic and wasn't meant to be highly detailed, more of a prop. Richard will texture it as this task has been allocated to him
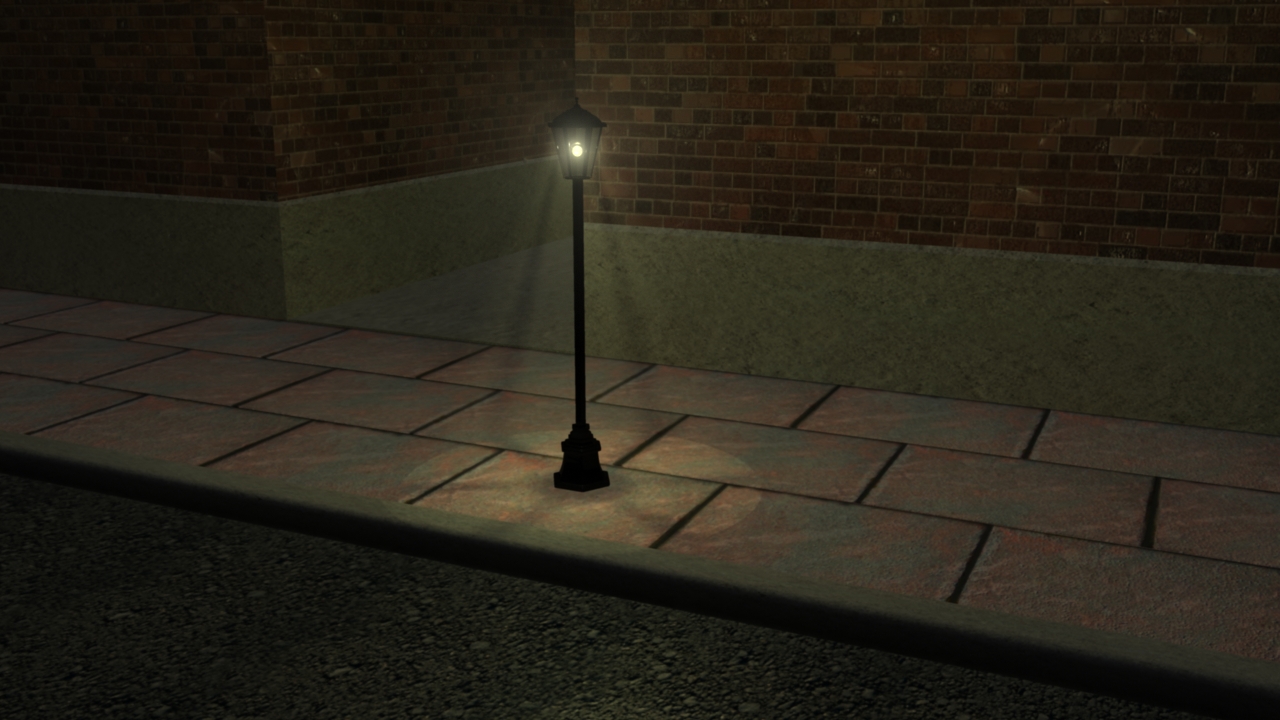
Light test

This is a lampost I modelled. I textured glass panes and bulb using Mental Rays' MIA_Material and added glow to a white blinn sphere inside. I would prefer if the fog had no light interuption in it and have tried using decay regions but to no avail.
I used the attribute spreadsheet in this scenario to turn off cast shadows for the top of the lamp as the spotlight is positioned just above.
Fire escape


And here is my version, I think I recreated it quite well

A Plan...
As the Formative assessment approaches an animatic is required, for this I have built the basic environment following joshs' plan view.
 I took joshs plan view straight into maya where I planar mapped in the Y axis to a plane. I then proceeded with transparency enabled to create a mock-up out of poly cubes and planes. this forms the basis of the final scene and at the moment the alley way and bar are all in one scene.


This could be a potential shot for later use in the final film and is part of a playblast. This has ambient occlusion applied just to get a basic feel of the models, in the final film the textures will give it more life.

This tileable brick texture I found through google images and was created by Patrick Hoesly www.zooboing.com I used a greyscaled version for the bump and the only troubles I had was matching up the bricks when walls met and created corners

This shot is taken from the end of the alley by the door to the bar, lighting could do with some revision, it is at night but I want to recreate more of a moonlit feel, at the moment there is a spot light that will be part of a wall mounted lamp that could possibly flash showing signs of a short circuit.
This tileable brick texture I found through google images and was created by Patrick Hoesly www.zooboing.com I used a greyscaled version for the bump and the only troubles I had was matching up the bricks when walls met and created corners


These two pictures show a small working progress of one shot, to get from the first shot to the second I have scaled/changed textures and geometry to get a slightly more realistic/appealing image.


This lamp is another light source for the exterior of the scene. I based the model on the above picture and used the copper preset on Mia_material and altered the default colour. It is a simple model and wont be seen much in the final film.


 This art deco style mantel clock I modelled based on the type above features Mia_material glass preset and also the copper for the rim around the face, both giving it that expensive look.
 This screenshot shows these curved bars on the left that I modelled and used the copper preset on. The chairs on the floor are my models and the booth on the very left uses a texture and bump I came across which I made tileable with the offset filter in photoshop.


I combined a leather texture with an image showing the 'tufting' style that can be found on some leather seats. For bump mapping i have been taking the images into photoshop, converting them to greyscale,upping the contrast and using a slight gaussian blur for a smoother overall bump.

Here is the bar attatched to the floor, it bends at 90 degrees to turn corners. To acheive this I first watched this video tutorial on youtube.
http://www.youtube.com/watch?v=Xcepknnw1pw
More Light


This lamp is another light source for the exterior of the scene. I based the model on the above picture and used the copper preset on Mia_material and altered the default colour. It is a simple model and wont be seen much in the final film.
Glass


The two materials I have used to replicate glass are Mia_Material and Dielectric Material.
The ashtray I modelled has the Mia_Material applied with the thick glass (blend 90%) preset applied and renders when caustics are switched on in render settings.
The wine glass and bottle are revolved EP curves that have been converted to polys. For texturing I had to approach these from a different angle to the ashtray as they contain what looks like wine. I found this tutorials which explains how to create a glass with liquid and information concerning reflection and refraction.
As for the label on the wine bottle label I have selected a rectangular portion of the wine bottle and duplicated it and projected a sheild shaped texture with an alpha mask applied around the edges.
More Mia_Material...


Texture and bump


I combined a leather texture with an image showing the 'tufting' style that can be found on some leather seats. For bump mapping i have been taking the images into photoshop, converting them to greyscale,upping the contrast and using a slight gaussian blur for a smoother overall bump.
more models
 The fan I created with referene to many fans, and I tried to give a style I felt would look fitting.
Richard textured it and used it in a couple of shots and has a mel script running for the fans to rotate.

Richard textured it and used it in a couple of shots and has a mel script running for the fans to rotate.

Here is the bar attatched to the floor, it bends at 90 degrees to turn corners. To acheive this I first watched this video tutorial on youtube.
http://www.youtube.com/watch?v=Xcepknnw1pw


This is a hat stand I modelled based on no particular design and was a practice really for extruding nurbs circles and squares along EP curves.
Rendering
When it came down to rendering it was better that the outside scene be seperate from the inside scene as it shortened rendering time, also with all of the model and textures on the interior it lagged the file so it was hard to navigate.
As the render farm was 'out of order' we had to render from home, me and richard spent two nights going through the finalised scene trying to acheive a good render.
Compositing
The final film was originally meant to reflect joshs storyboard shot for shot. However due to lack of time it became a series of camera shots but still managed to include a small portion of character animation.
As a group we distributed the rendering and it was sent back to myself and richard for compositing. As a group we had agreed on the cameras and was a case of putting it together.
Music
Josh had found the two music tracks featured 'on the corner' by Alexander Lasarenko and Tommy Dorsey 'opus one'.
I then cut the two in Adobe Soundbooth and then found the other sound effects needed from www.sounddogs.com these included the light buzz, door knock, record slip, hatch opening, door kick and slam, all were part of longer files that I had to shorten and tweak in soundbooth.
Overall
Overall this term I have learnt a fair amount in regards to modelling, lighting and texturing, and through tutorials and trial and error found different ways of working and acheiving results. There is however alot more I need to learn in terms of lighting and texturing.
As for lighting I wasn't that happy with the result, but in honesty probably the least time went into this. externally it can be too dark in places and internally too light. The interior does lack the darkness that I had originally envisioned and there is a lack of shadows and dark corners.
The storyboard idea had to be cut for time reasons, it would have been nice to have a short film with lots of character animation but the term required focus on the environment which makes sense as I have still have things to learn on that aspect.
The storyboard idea had to be cut for time reasons, it would have been nice to have a short film with lots of character animation but the term required focus on the environment which makes sense as I have still have things to learn on that aspect.